|
|
INTRODUCTION
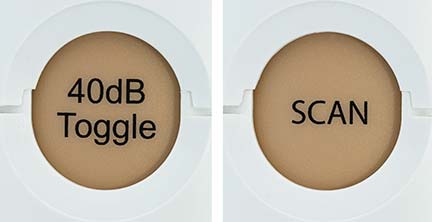
The OtoScreen IV hearing screener has two buttons, a ”Scan” button and a “40dB Toggle” button. See figure 1. The Scan button initates a tone when held down and sequences through the four frequencies (500, 1000, 2000 and 4000 Hertz) when pressed and released. The 40dB-Toggle button toggles the sound level between 40 dB HL and the threshold tone level.
The threshold sound level is 20 dB HL for a Pediatric unit and 25 dB HL for a Standard unit. Both types of units have the same light-brown switchplate color. Whether a unit is Pediatric or Standard is indicated on the serial number label inside the unit.
BASIC OPERATING INSTRUCTIONS
- Press and hold the Scan button down with your thumb. The unit turns on and a green light indicates that the 1000 Hz tone is selected. A yellow light comes on after one second indicating that a tone is being presented. See figure 2.
- Release then press and hold the Scan button again to advance to the next frequency. A yellow light comes on after one second indicating that a new tone is active. A tone is only presented to a subject when the Scan button is held down.
- The green lights always indicate which frequency is active.
- Quickly pressing and then releasing the Scan button advances the unit to the next frequency without presenting a tone. This is useful when you want to skip a tone, repeat a tone or present tones in a different order.
- To increase the sound level to 40 dB, press and release the “40dB Toggle” button with your index finger. A red light turns on indicating that the unit is outputting a 40 dB tone. See figure 3.
- The unit stays in the selected “sound level” mode until the 40dB-Toggle button is pressed again. This makes it easy to test at either the threshold level or the 40 dB level.
Become familiar with operating the unit before using it to screen a subject for hearing loss.
Your unit should be calibrated every 1-2 years. Check your State regulations. Go to www.HearingScreeners.com for information about re-calibrating your unit.
PRACTICE SEQUENCE OF BUTTON PUSHES (video shown on right of screen)
The video on the right of the screen is demonstrating the following sequence of button "pushes" and plays in a continuous loop. You can "mouse over" and pause the video if desired.- The sequence starts when no LEDs are on. The Scan button is pressed and released to turn on the unit. The 1 kHz green LED light turns on. No tone is present yet.
- The initial sound level needs to be set before screening. This can be the threshhold sound level (20 or 25 dB) or the 40 dB sound level. On power up, the unit defaults to the threshold sound level.
- In this sequence the unit's sound level is toggled back and forth 2 times. To change to the 40 dB sound level the Toggle-40dB button is pressed and released. The Red LED flashes to indicate the change to 40 dB. Next the Toggle-40dB button is pressed and released again and the yellow LED flashes to indicate the sound level has changed back to the threshold sound level. This "toggling" sequence is repeated.
- Then the Scan button is pressed and released quickly 4 times to sequence through the frequencies without presenting a tone.
- Then the Scan button is held down on the 5th press and the "Low dB" (threshold dB) yellow LED turns on. When this LED is on a tone is being presented. The green LED indicates that the selected frequency is 2 kHz.
- Next the Scan button is release and then held down again. The frequency advances to 4 kHz and the yellow LED turns on indicating a tone is being presented.
- The Scan button is released. Notice that the yellow LED turns off. A tone is only presented to a subject when the Scan button is held down.
- Next the Toggle-40dB button is pressed and released to select the 40 dB sound level. The Red LED flashes indicating the change.
- The Scan button is then pressed and quicky released 2 times and then held down on the 3rd push of the button. The Red 40 dB Active LED turns on. This indicates that the 40 dB tone is being presented. The 2 kHz green LED is on indicating the active frequency.
- The Scan button is released and held down again. The frequency advances to 4 kHz and the Red LED turns on indicating the 40 dB tone is active.
- The Scan button is released. No tone is presented.
- Last, the Scan button is pressed and quickly released 2 time to return the unit to the beginning 1 kHz tone. No tone is active. The 40 dB sound level is still selected.
There are many different ways to use the OtoScreen III to screen hearing. Following is one possible method.
STEP ONE – TALK TO THE SUBJECT
- For successful screening there needs to be good communication with the subject. Talk to the subject before any screening begins so there is a mutual understanding about what responses are expected.
- Explain to the subject to raise their hand or finger when they hear something and lower their hand or finger when they don’t. See figure 4.
- For young children simplify the communication and make it fun. The child could wiggle their nose and say “princess” or “cowboy” instead of raising a hand or finger. Be creative!
STEP TWO – QUICK CHECK
Do the following quick-check sequence to see if the subject is hearing all the tones:
- Press the Scan button to turn the unit on. Use the “40db Toggle” button to select what sound level to start your testing at.
- For children and the general population testing is done first using the threshold sound level. For seniors testing first at the 40dB level is a good choice.
- Place the unit over one of the subject’s ears centered on their ear canal.
- Press and hold the Scan button until the yellow light comes on. If the subject doesn’t raise their hand, make a note that further testing is needed.
- Release and press the Scan button again. If the subject doesn’t raise their hand, make a note that further testing is needed.
- Repeat the above step as many times as necessary to get a consistent result for all frequencies. The 500 Hz test should be omitted if the testing environment is not very quiet.
- Repeat all of STEP TWO for the other ear
STEP THREE – VERIFY HEARING PROBLEMS
- For each ear and each frequency the subject didn’t raise their hand (or lowered their hand) in STEP TWO above, scan the unit to that frequency and hold the Scan button down until the yellow light turns on and a tone is presented.
- If you are testing at the threshold sound level and the subject doesn’t raise their hand indicating a tone is present, immediately press and release the 40dB-Toggle button to increase the sound level to 40 dB to see if the subject can hear the louder tone.
- If a subject doesn’t raise their hand for either the threshold sound level or the 40 d sound level, there is a good probability there is hearing loss at that frequency.
- If you are testing seniors at the 40 dB sound level, if the subject doesn’t hear the louder tone usually there is no need to press the 40dB-Toggle button and test at the softer tone. This is at your discretion.
- Subjects less than 65 years old should be able to hear tones at both the threshold dB level and the 40 dB sound level. Subjects 65 years and older are only required to hear the tones at 40 dB.
- Repeat STEP THREE as many times as necessary to get a consistent result.
STEP FOUR – REFER
- Refer the subject for more detailed testing if a hearing loss is detected.