|
|
INTRODUCTION
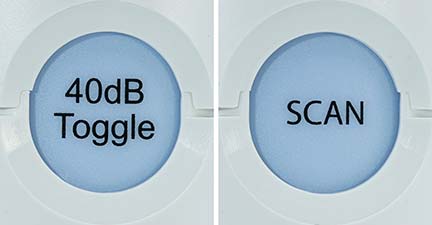
The OtoPulse hearing screener has two buttons, a ”Scan” button and a “40dB Toggle” button. See figure 1. The Scan button sequences through the four frequencies (500, 1000, 2000 and 4000 Hertz) and the 40dB-Toggle button toggles the sound level between 40 dB and the threshold tone sound level.
The threshold tone sound level is 20 dB HL for a Pediatric unit and 25 dB HL for a Standard unit. Both types of units have the same light-blue switchplate color. Whether a unit is Pediatric or Standard is indicated on the serical number label inside the unit.
BASIC OPERATING INSTRUCTIONS
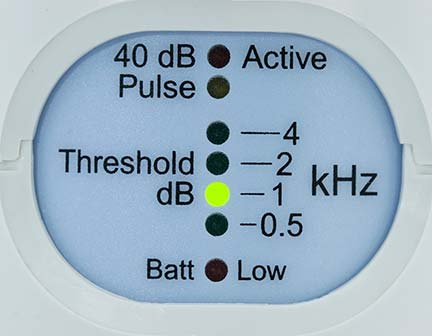
- Press and release the Scan button. The unit turns on and a green light indicates that the 1000Hz threshold tone is active. See figure 2.
- Press and quickly release the Scan button to advance to the next frequency.
- The green lights indicate which frequency is active.
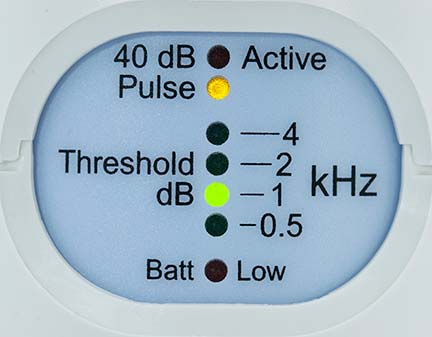
- Holding the Scan button down instead of quickly releasing it causes the unit to “pulse” on and off every 200 milliseconds. A yellow light flashes indicating that the unit is pulsing. See figure 3.
- If the Scan button is released while the unit is pulsing the pulsing stops. The frequency remains unchanged
- To pulse the frequency again, press and hold the Scan button again.
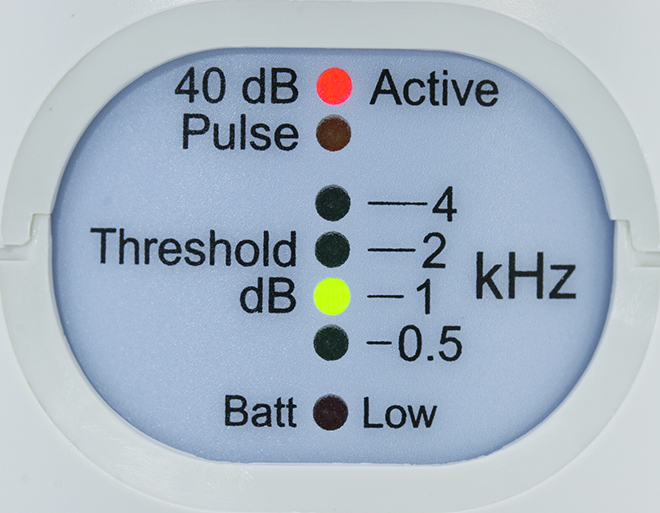
- To increase the sound level to 40 dB press and release the 40dB-Toggle button. A red light turns on indicating that the unit is in the 40 dB mode. See figure 4.
- To return to the threshold sound level press and quickly release the 40dB-Toggle button again. The red light turns off.
- Holding the Toggle-40dB button down shuts the unit off. The unit turns itself off if no buttons are pushed for 60 seconds.
Become familiar with operating the unit before using it to screen a subject for hearing loss.
The pulsing function of the unit is optional but is useful if the subject has Tinnitus (ringing in the ears). It also helps to clarify if a subject is actually hearing a tone.
Your unit should be calibrated every 1–2 years. Check your State regulations. Go to www.HearingScreeners.com for information about re-calibrating your unit.
PRACTICE SEQUENCE OF BUTTON PUSHES (video shown on right of screen)
The video on the right of the screen is demonstrating the following sequence of button "pushes" and plays in a continuous loop. You can "mouse over" and pause the video if desired.- The sequence starts when the green 1 kHz LED is on by itself and pauses for a second. This indicates the Scan button was pressed to turn on the unit. The 1000 Hz tone is now on.
- The Scan button is then pressed and quickly released 4 times. This scans through all the frequencies. A tone is always present.
- Next the Toggle-40dB button is pressed and released. The 40 dB Active Red LED comes on. Then the Scan button is pressed and quickly released 4 times. This scans through all the frequencies at the 40 dB sound level. The 40 dB tone is always present.
- Next the Scan button is held down until the pulsing function engages for the 40 dB sound level.
- Then the Scan button is pressed and quickly release 2 time to advance to the 4000 Hz frequency. Then the Toggle-40dB buttone is pressed and released to return to the threshold sound level.
- Next the Scan button is held down to engage the pulsing function again at the threshold sound level.
- Now the Toggle-40dB button is pressed and released 2 times while the Scan button is being pressed. This toggles the pulsing sound level back-and-forth between the threshold and 40 dB level for the selected frequency without advancing the frequency.
- Last, the Scan button is pressed and quickly released 2 times to return to the beginning state of this sequence of button pushes.
There are many different ways to use the OtoPulse to screen hearing. Following is one possible method to follow.
STEP ONE – TALK TO THE SUBJECT
- For successful screening there needs to be good communication with the subject. Talk to the subject before any screening begins
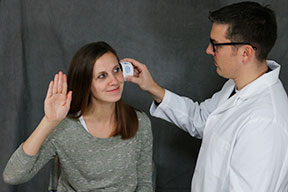
- Explain to the subject to raise their hand when they hear something and lower their hand when they don’t. Also explain to them to speak out when what they hear any changes and explain what the change was. See figure 5.
- For young children simplify the communication and make it fun. The child could wiggle their nose and say “princess” or “cowboy.”
STEP TWO – SETUP THE UNIT
- Holding the OtoPulse unit away from the subject, press and release the “Scan” button to turn the unit on.
- For people under the age of 65 the unit is ready for use as soon as it turns on. The lights should be as indicated in figure 2.
- The testing sound level for people 65 years and older is 40 dB. Press and release the 40dB-Toggle button to engage the 40 dB sound level. The lights should be as indicated in figure 4.
STEP THREE – QUICK CHECK
Do the following quick-check sequence to see if the subject is hearing all the tones:
- Place the unit over one of the subject’s ears centered on their ear canal.
- If the subject raises their hand ask them what they hear to confirm it is a tone. If the subject doesn’t raise their hand make a note that further testing is needed for this frequency.
- Press and quickly release the Scan button to advance to the next frequency. If the subject hears the tone their hand should be raised and they should verbally indicate they hear a different pitch. If the subject doesn’t raise their hand or comment on the frequency change, make a note that further testing is needed for this frequency.
- Repeat the above step as many times as necessary to get a consistent result for all frequencies. The 500 Hz test should be omitted if the testing environment is not very quiet.
- Repeat all of STEP THREE the other ear
STEP FOUR – VERIFY HEARING PROBLEMS
- For subjects under the age of 65 the sound level should be set to threshold sound level. This is normally 25 dB for adults and 20 dB for children. A sticker on the underside of the units lid indicates which threshold frequency is programmed for your unit.
- For subjects over 65 years of age the sound level should be set to 40 dB. Use the 40dB-Toggle button to set it. The red light should be on (figure 4).
- For each frequency the subject lowered their hand or didn’t hear the change to the next frequency, scan the unit to that frequency and hold the “Scan” button down until the yellow light begins to flash. See figure 3.
- Place the unit over the subject’s ear centered on their ear canal.
- Ask the subject what they hear. If they don’t hear a pulsing tone there is a good probability there is hearing loss at that frequency,
- Repeat STEP FOUR as many times as necessary to get a consistent result.
STEP FIVE– OPTIONAL THRESHOLD DB CHECK FOR SUBJECTS 65 YEAR OF AGE OR OLDER
- Even though 40 dB is the sound level testing standard for people 65 years and older, it is possible that a subject passing the 40 dB level may not be able to hear the same sound if it is slightly softer.
- Set the sound level to the threshold sound level. The unit should be putting out a 25 dB tone at 1000 Hz with the lights showing as indicated in figure 2.
- Repeat STEP THREE at the softer 25 dB sound level (red light off).
- For each tone the subject could not hear at the 25 dB sound level it is a good idea to re-confirm that they did hear it at the 40 dB sound level. You can “toggle” back and forth between the 40 dB and 25 dB sound levels by pressing and quickly releasing the “40dB Toggle” button.
- If a person 65 years or older can hear a 40 dB tone but not a 25 dB tone, this means their hearing is not as good as a younger person. This is normal. The person administering the test should explain this to the subject and decide together if more detailed testing is needed.
STEP SIX– OPTIONAL PULSE CHECK
- It is possible that some subjects think they hear a tone or say they hear a tone when they really don’t. The “pulsing” capability of the OtoPulse unit helps to overcome this.
- Scan the unit to 1000 Hz .
- For subjects over the age of 65 activate the 40 dB sound level (red light on).
- Repeat STEP THREE but for each frequency hold the “Scan” button down until the unit begins to pulse (yellow light starts flashing).
- If the subject hears the tone pulsing they should mention this versus just hearing a constant tone.
- If they don’t hear the pulsing they are not hearing the tone either and this should be recorded for that frequency.
NOTE – Remember that holding the “Scan” button down won’t advance the unit to the next frequency. To advance to the next frequency press and quickly release the “Scan” button.
STEP SEVEN– 40 DB TEST FOR SUBJECTS UNDER THE AGE OF 65
- For any frequency a hearing loss was detected at the threshold sound level, you should also check if there is a hearing loss at the louder 40 dB sound level.
- Checking the 40 dB sound level gives an indication of the severity of the hearing loss.
- If a subject younger than 65 years of age can’t hear a 40 dB tone, there is a higher probability there is a hearing loss at that frequency.
- Use the 40dB-Toggle button to set the sound level at 40 dB. The lights should be as indicated in figure 4. Repeat STEP FOUR for each frequency a hearing loss is suspected.
STEP EIGHT - REFER
- Refer the subject for more detailed testing if a hearing loss is detected.
Click the "S-O-A-R" button on the left for pass/fail criteria